Learning Objectives
After completing this lesson, you’ll be able to:
- Carry out a data join with a web-based dataset.
- Write data to a compressed output using the FeatureWriter transformer.
- Create a web connection.
- Upload data to FME Server (or another online service) using a workspace.
- Download data from FME Server (or another online service) using a workspace.
Resources
- CompleteRoads.dwg
- C:\FMEData\Data\Transportation\CompleteRoads.dwg on Safe Software training machines
- Snowfall.xlsx
- C:\FMEData\Data\Transportation\Snowfall.xlsx
- Complete workspace
- C:\FMEData\Workspaces\AdvancedReadingAndWriting\exercise-use-web-based-datasets-complete.fmw
Introduction
In this exercise, we're joining snowfall data to a set of road features and writing the results to an FME Server Resource folder for other users to access. We'll create a workspace that joins local data to an online dataset, processes the data, and writes it to a different web destination.
1) Add Reader
Start FME Workbench (2022.1 or later), and in a blank workspace, add a reader with these parameters:
| Reader Format |
Autodesk AutoCAD DWG/DXF |
| Reader Dataset |
https://s3.amazonaws.com/FMEData/FMEData/Data/Transportation/CompleteRoads.dwg |
| Parameters |
Group Entities By: Attribute Schema |
| Coord. System |
UTM84-10N |
| Workflow Options |
Single Merged Feature Type |
The Group Entities parameter is an AutoCAD-specific option. It ensures that we have attributes from the AutoCAD source data exposed in Workbench.
The Merged Feature Type option means all the road data is treated as a single map layer, which is fine because we aren't too interested in handling multiple layers separately.
2) Locate Snowfall Dataset
In a web browser, browse to the City of Interopolis Open Data Portal (https://s3.amazonaws.com/FMEData/Interopolis/interopolis.html).
Locate the dataset for Snowfall Predictions, right-click on where it says Excel Spreadsheet, and choose to copy the URL:
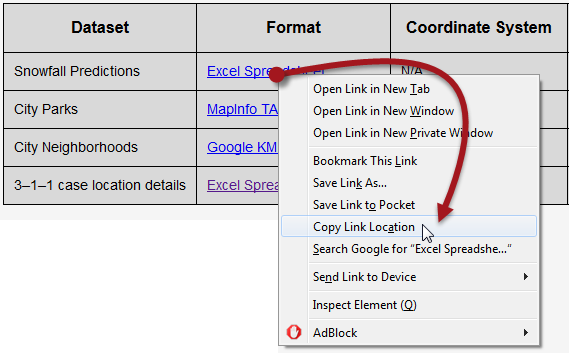
The exact command will vary by the web browser.
Back in FME Workbench, add a DatabaseJoiner transformer and connect it to the roads feature type. Open the DatabaseJoiner parameters.
Set the parameters as follows:
| Reader Format |
Microsoft Excel |
| Reader Dataset |
https://s3.amazonaws.com/FMEData/Interopolis/Snowfall.xlsx |
...where, of course, you can paste the URL you copied from the web browser.
Click the Parameters button and check that the data is being read correctly. The Preview table should show records with the correct columns (StreetId, EstimatedSnowfall, etc.).
Back in the main DatabaseJoiner dialog, select Snowfall as the join table and select StreetId as both the Feature Attribute and Table Field to be joined:

The final parameters to set in the DatabaseJoiner are Fields to Add and Cardinality:
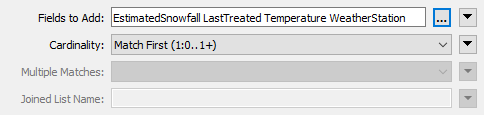
Select the following Fields to Add:
- EstimatedSnowfall
- LastTreated
- Temperature
- WeatherStation
Ensure Cardinality is set to Match First (1:0...1+); each road feature will be joined to the first matching database record FME finds. It's the option least likely to lead to error messages in the log.
Now it's time to write the data. It's not as simple to write data directly to a web service, so what we'll do is write it to a zipped, file-based dataset, and then upload that dataset to a web service.
So, add a FeatureWriter transformer and connect it to the KMLStyler transformer (if you added one) or the DatabaseJoiner transformer (if you didn't).
Open the parameters and set the writer up as follows:
| Writer Format |
Google KML |
| Writer Dataset |
C:\FMEData\Output\Training\RoadSnowfall.kml |
Then click on the dropdown arrow to the right of the Dataset parameter, and choose the option to Zip Output:
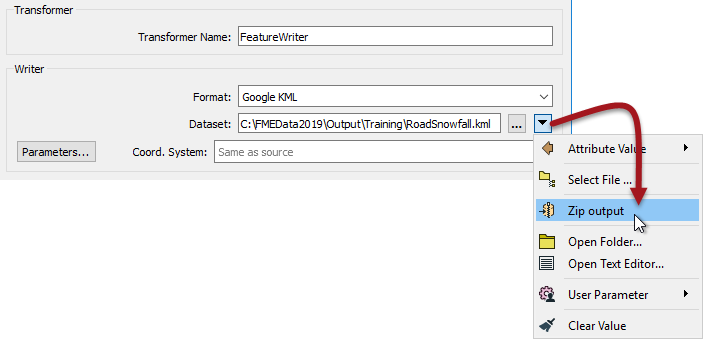
This configuration instructs the transformer to write data directly to a zipped (compressed/archived) file. You can manually type in a path including .zip, if you prefer.
As a final step in this transformer, rename the output feature type to SnowfallPredictions:
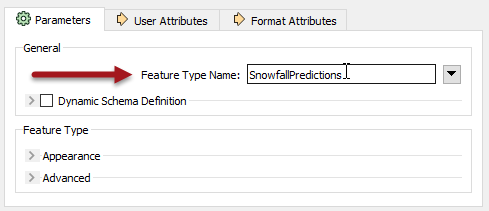
Now when the workspace is run, a dataset will be written. The FeatureWriter will create an attribute called _dataset to record the name and path of the dataset. The next step is to upload this file to a web service...
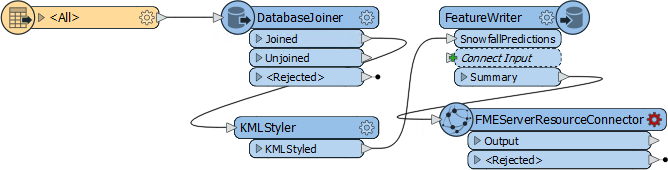
Add an FMEServerResourceConnector transformer (renamed the FMEFlowResourceConnector in newer versions of FME) and connect it to the FeatureWriter:Summary output port. The workspace should now look like this (KMLStyler optional):
In the parameters dialog, ensure that the FME Server Action is set to Upload. If you are using an FME Academy VM, use the existing Training FME Flow web connection for the FME Server Account. Otherwise, open the drop-down menu and click Add Web Connection:

In the FME Server Connection Dialog, change the Connection Name if desired. Then set the following parameters and click Authenticate:
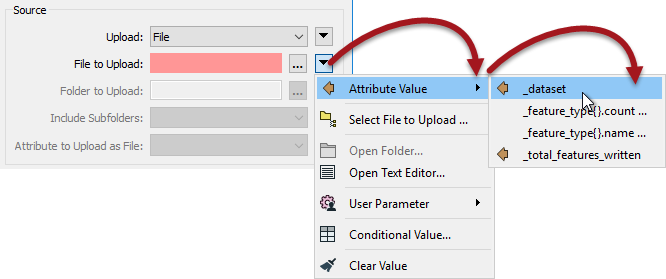
Ensure the Source Upload parameter is set to File. For File to Upload parameter, click the drop-down icon and select Attribute Value > _dataset:
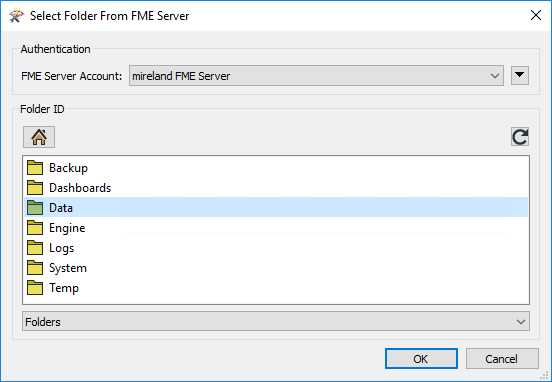
Finally, for the FME Server Destination, click on the ellipsis next to Folder ID. This will connect to your FME Server Resources folder. Click on the Data folder to select it and click OK:
The parameter is now set to upload to the FME_SHAREDRESOURCE_DATA/filesys folder. That was the final part of the FMEServerResourceConnector setup, so click OK to close its parameters dialog.
6) Run Translation
Save the workspace and then run it.
Oops! There are some error messages. The key one is:
FMEServerResourceConnector_<Rejected> (TeeFactory): FMEServerResourceConnector_<Rejected>: Termination Message: 'FMEServerResourceConnector output a <Rejected> feature. To continue translation when features are rejected, change 'Workspace Parameters' > Translation > 'Rejected Feature Handling' to 'Continue Translation''
We can see the FMEServerResourceConnector output a feature to the <Rejected> port. If we inspect that feature, it has a value for fme_rejection_code of:
ERROR_DURING_PROCESSING
Not very helpful, but if we dig around, the problem is that the path only needs to point to the zip file, not the file within it. Let's fix that.
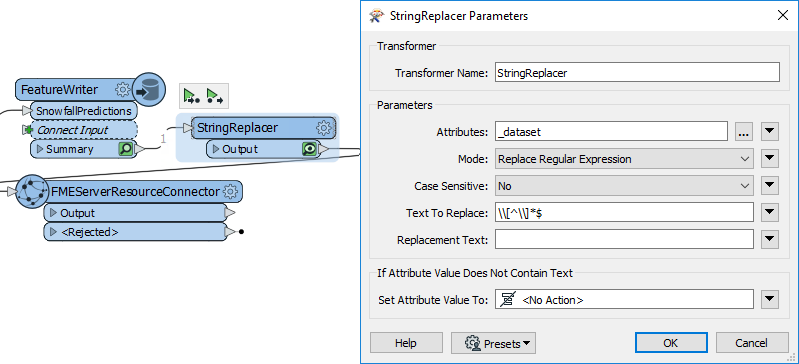
Add a StringReplacer transformer between the FeatureWriter and FMEServerResourceConnector transformers. Set it up with the following parameters:
| Attributes |
_dataset |
| Mode |
Replace Regular Expression |
| Text to Replace |
\\[^\\]*$ |
Leave the Replacement Text field empty. That regular expression will look for the final \ character in the string and replace everything after it with the replacement text (which is nothing):
Now when we run our workspace, the data will write to our local disk but also upload the output file onto FME Server, where any of our colleagues can download it.
Run the workspace.
7) Test Upload
Check the workspace results in Visual Preview. The output of the FMEServerResourceConnector will be a single feature with an attribute storing a link to the data on Server.
Copy the contents of the _direct_download_link attribute to the system clipboard. Paste the copied link into the address bar of a web browser and press the Enter/Return key.
The uploaded file will be downloaded from FME Server. If prompted for connection parameters, use the username and password you entered into the FME Server connection.

You could test the result in a few other ways:
- Create a second workspace. Place a Creator and FMEServerResourceConnector combination and - this time - set the FME Server Action to Download. Click the ellipsis next to FME Server Source Object ID to open a file browser and then browse to the Data folder to locate the SnowfallPredictions KML dataset. Click OK and run the workspace. The file will be downloaded as an attribute.
- Log in to the FME Server web interface at http://localhost, and browse to Files and Connections > Resources > Data. You should see the ZIP file there.
Congratulations! You have successfully read and written data using web data connectors.